FAQ: OcPoC™ Zynq Mini
FAQ
Do you have any extra information on your products?
We strive to keep as much relevant information as possible here on our User Hub or in our datasheets available on our website. If you have specific information you want that you don't see in our documentation or FAQ here, please e-mail us at [email protected] and let us know what you're looking for!
Is the OcPoC flight controller compatible with any OS?
The OcPoC flight controller is flight hardware which boots up its ARM processor with Ubuntu-armhf (though it is also capable of running Petalinux builds). So the OcPoC runs an OS, and the flight software is compatible with the Linux build running on the OcPoC's ARM.
You can 'talk' to the OcPoC flight controller from any other OS through an SSH program (e.g. PuTTY and gtkterm) over the available micro-USB port. However, the SD card is formatted in such a way that Windows can't recognize it. For now, from Windows you can read and write to the SD card through a Virtual Machine running Linux.
Can I make changes to the OcPoC flight controller's GNC code?
The OcPoC supports both Ardupilot and PX4, both of which are open source flight software. Since the low level guidance, navigation, and control (GNC) code is located in the flight software, you have access to the source code and can make any and all changes you can imagine.
On a side note, OcPoC is also capable of running ROS either alone or in parallel with the flight stack.
Will work with OcPoC?
In general, if a sensor or peripheral system communicates over one of the many I/O protocols that OcPoC is compatible with, then yes it will work with OcPoC. However, there may not be existing support for that sensor/system in the flight software.
Here are some commonly requested systems that are already compatible with at least Ardupilot:
- RTK GPS
- RTK corrections from the base station are sent over Mavlink through the ground station software, meaning this will certainly work on OcPoC with the correct setup for the particular system.
- Ping2020 (ADS-B for sUAS)
- Connects over UART (a serial port), and support already exists in Ardupilot.
- Ground station setup is covered in Ardupilot's ADS-B documentation. There are some slight changes for OcPoC, but we can readily help with this integration
If you have a particular sensor or system you want to use with OcPoC that doesn't currently have support in either Ardupilot or PX4, send us an e-mail at [email protected]. We can help figure out if your desired sensor/system can 'talk' with the OcPoC.
Does OcPoC support my airframe type (e.g. VTOL, CTOL, etc...)?
OcPoC will support any airframe type that is supported by either Ardupilot, PX4, or your own version of these flight stacks. The default FPGA configuration for OcPoC supports 12 PWM output pins, so it can easily support octocopters with an extra 4 PWM output signals for peripheral triggers (e.g. landing gear, crop sprayer, etc...).
Does OcPoC support MissionPlanner and QGroundControl?
Yes, because OcPoC runs on Ardupilot and PX4, it communicates over Mavlink, and thus works with MissionPlanner, QGroundControl, or any other ground station using Mavlink.
Why isn't uLanding working on Pixhawk?
Although we've updated the uLanding driver in Ardupilot's master branch, these updates have yet to make their way into the stable releases of ArduCopter (3.5.3) and ArduPlane (3.8.2). Essentially, the driver in the stable releases still only works for the original version of uLanding.
To fix the issue in one of these stable releases, you can copy an updated uLanding driver from our repo as a drop-in replacement for the AP_RangeFinder_uLanding.cpp file, then rebuild ardupilot.
Why is ArduCopter Not Executing?
One common cause of the Ardupilot executable (arducopter, arduplane, etc...) not running may be due to an error while copying the binary from the PC onto the SD card. You may see something like the image below.
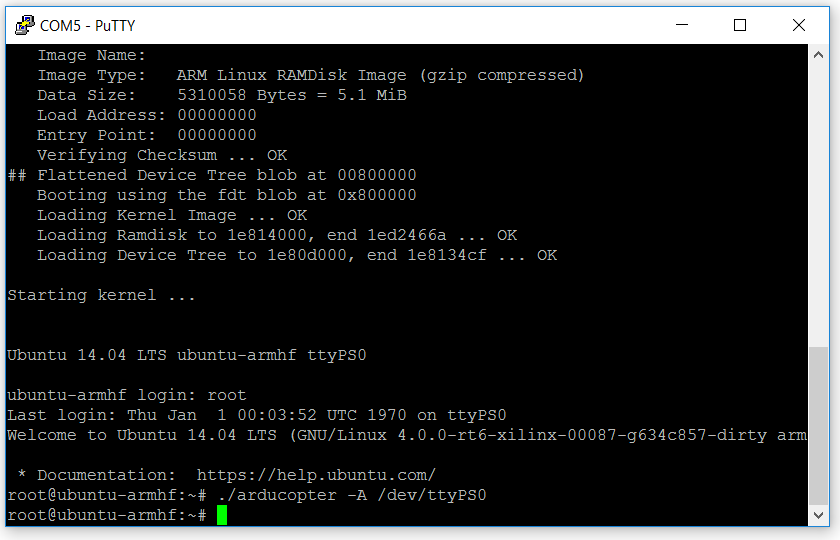
arducopter not executing
You can double check the file size of your Ardupilot executable using the following command in the gtk terminal (or PuTTY from Windows):
ls -la
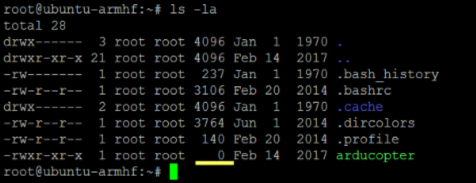
arducopter executable has no filesize (as underlined above)
Solution: Recopy the Ardupilot binary from your PC onto the SD card for OcPoC - making sure to properly eject the SD card - and check the file size. You can follow the steps HERE to accomplish this process. Start OcPoC again and check the file size on the executable on the OcPoC; you should see something similar to the following image.
ls -la
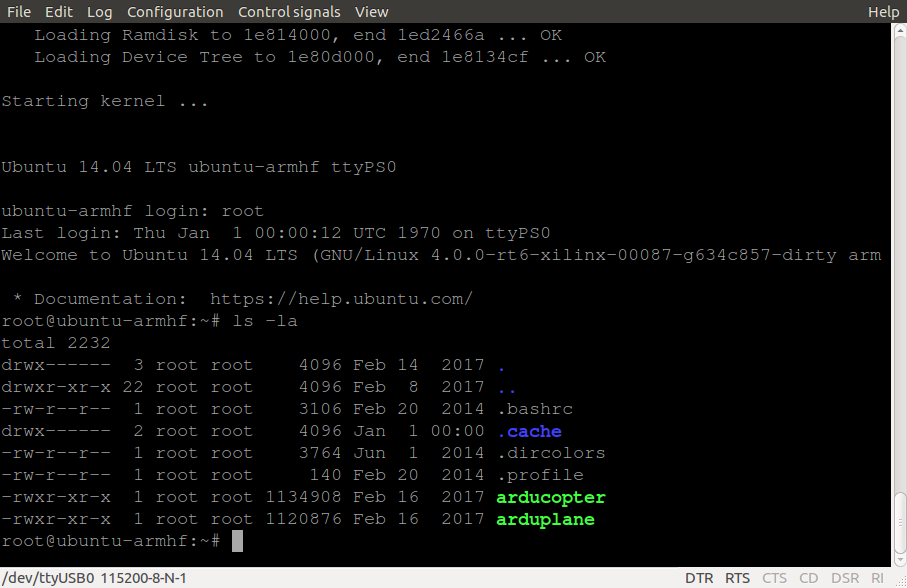
Correct file size of ArduCopter
Under normal circumstances, when you start Ardupilot (in this case, arducopter), you should see something like the gtkterm display shown below.
./arducopter -A /dev/ttyPS0
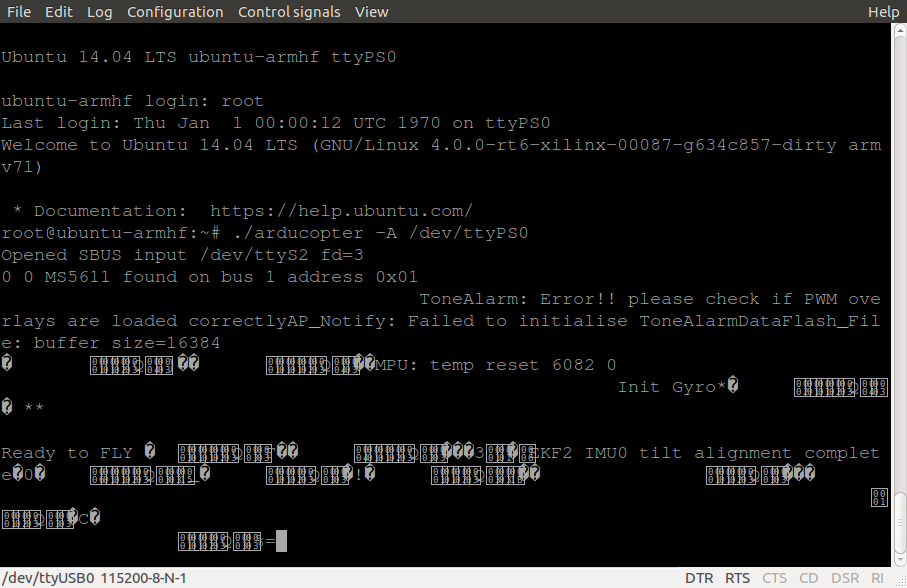
proper ArduCopter output
Why won't Ardupilot's Waf configure for ocpoc_zynq?
If you encounter an error with the "./waf configure --board ocpoc_zynq" command, you may be missing some required toolchains. This error will look similar to the following image:

Solution: This issue can usually be resolved by double checking the installation of the required tools. Please refer to the '[Downloading Required Files'] section(https://dash.readme.io/project/aerotenna/v1.0/docs/downloading-required-files-1) to make sure you have everything you need.
How do I connect to OcPoC™ from Windows?
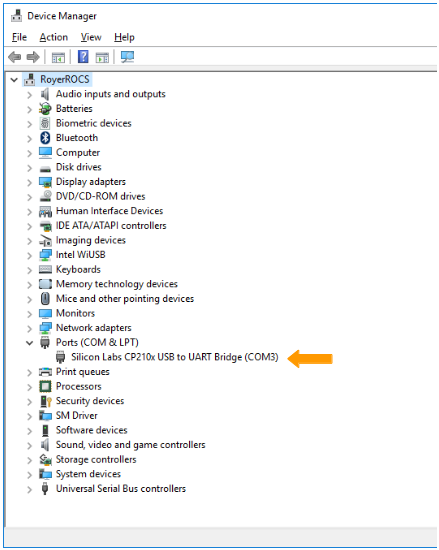
If you need to connect to the OcPoC™ from a Windows PC, you'll first need to install PuTTY. Connect the OcPoC™ to your PC, open the Device Manager in Windows (in Windows 10 you can simply search for 'Device Manager'). With power supplied to the OcPoC™ you should see something like the image below, wherein you should see a drop-down item for "Ports (COM & LPT), and in that section should be a device similar to "USB to UART Bridge". The "(COM#)" tells you what COM port you'll use to connect via PuTTY.
Note: if you have multiple devices connected to your PC, unplug the USB cable coming from the OcPoC™ and plug it in again. The Device Manager window will remove one COM device, then reveal it again. That's the correct COM port for the OcPoC™.
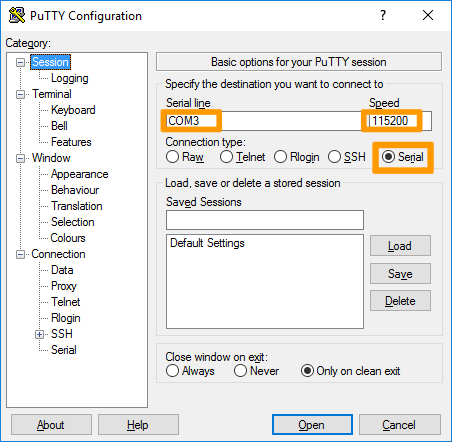
Once you have determined the correct COM port, open PuTTY, select the "Session" category (which should be the default upon opening PuTTY), and select the following settings:
- Serial Line: COM#
- Speed: 115200
- Connection type: Serial
Your setup should look like this:
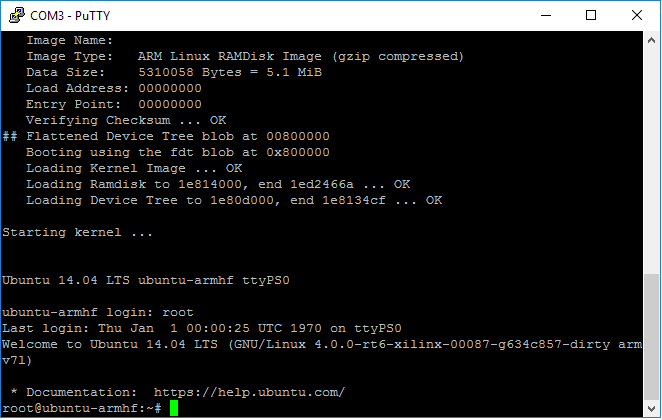
Making sure you have the OcPoC™ powered on and connected to your PC, click Open. Once OcPoC™ has finished its boot up sequence, you should see something like the image below.
How do I build Ardupilot in a Linux OS on a flash drive?
If you are running Linux from a flash drive, you may encounter several issues throughout the "Get Up and Running Quickly" tutorial while trying to build the Ardupilot executable. For example:
- You may see an error that says "Could not create the directory ...". This error means you need to fix the permissions on your flash drive (see tutorials for 'chmod' and 'chown').
- When you build the Ardupilot executable with the "./waf --targets bin/arducopter" command, you may get an error that says "ImportError: No module named future". There are two potential reasons for this error:
- You're missing the prereqs to build ardupilot. Be sure to run all of the "Building autopilot:" commands in the Load Files onto SD Card section.
- The OS update may not be working properly wherein your OS on the flash drive may be using a non-existent CD-ROM. Explicitly remove the CD-ROM drive from your flash drive based OS, and try the Get Up and Running Quickly tutorial from the start.
How do I setup OcPoC™ from a virtual machine?
Running Linux in a virtual machine generally shouldn't cause any issues with the initial setup of OcPoC™. However, you may have problems talking to the OcPoC™ from gtkterm. If this is the case, we recommend using PuTTY from Windows to connect to OcPoC™ after you've setup the SD card with the flight software executable.
Why isn't my replacement USB WiFi adapter not working?
Once you connect a USB WiFi adapter to the OcPoC, the board will assign the device a name and address in memory. If you need to replace your WiFi adapter, you should follow these steps.
-
Power on your board, connect via USB and log in with GTK terminal.
-
Remove old WiFi adapter.
-
execute the following command in GTK terminal
sudo rm /etc/udev/rules.d/70-persistent0net.rules
- Power down your Ocpoc, plug your new WiFi adapter in and power back up.
If your new WiFi adapter is compatible with the OcPoC it should automatically be recognized and configured.
Updated over 8 years ago
