Using Petalinux OS
These steps will walk you through downloading and installing Petalinux, which is recommended if you are planning to do your own kernel development. Otherwise we recommend using Ubuntu, which has downloading and installing instructions here.
Download/Install Toolchain
First you will want to start downloading Petalinux-v2015.4 This download is over 1.6 gigabytes so it may take a few minutes. Follow these steps:
- If that link takes you to a generic part of the Xilinx site, navigate to: SUPPORT -> Services -> Downloads & Licensing -> Embedded Development -> Archive
- Download and run the "PetaLinux 2015.4 Installer"
You will have to register a Xilinx account if you do not have one already.
Once the download is complete, you will want to make sure you have all the required libraries to run it. In a terminal execute the following command:
sudo apt-get install tofrodos iproute gawk gcc git-core make net-tools \
libncurses5-dev tftpd zlib1g-dev libssl-dev flex bison libselinux1 \
libz1:i386 libncurses5:i386 libbz2-1.0:i386 libstdc++6:i386 \
zip python-jinja2 libstdc++6-5-dbg-armhf-cross
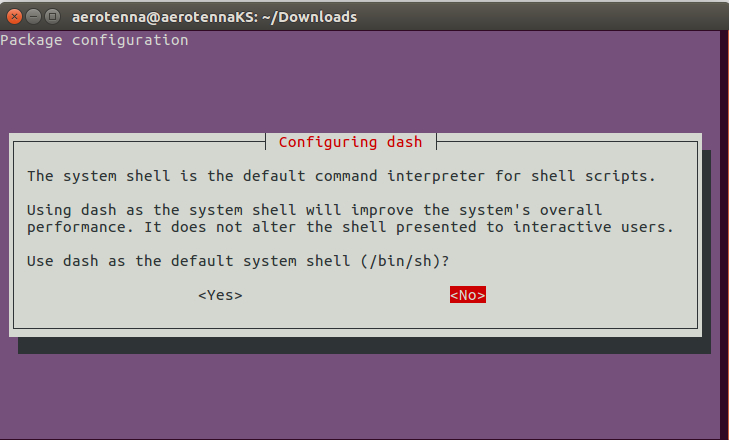
sudo dpkg-reconfigure dash

Now navigate to where you downloaded "petalinux-v2015.4-final-installer-dec.run' and execute the following commands.
chmod +x petalinux-v2015.4-final-installer-dec.run
sudo ./petalinux-v2015.4-final-installer-dec.run /opt/PetaLinux
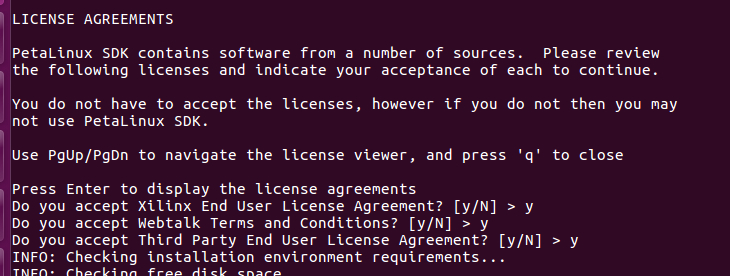
This may take a few minutes to get set up. Eventually, you will see text regarding the LICENSE AGREEMENTS (as shown below). Once you have pressed 'q' then 'y' then 'Enter' a total of three times, the the installer will complete the set up process.

Once this process is complete, you need to add an ENV variable for the OcPoC toolchain. In a terminal, open your "~/.bashrc" file, and add the following lines to the end of the file:
# ENV variable for OcPoC toolchain (for PX4 build)
export OCPOC_TOOLCHAIN_DIR="/opt/PetaLinux/petalinux-v2015.4-final/tools/linux-i386/arm-xilinx-linux-gnueabi/bin"
Downloading PX4 Flight Stack
If you haven't run through the ArduPilot on OcPoC™ Zynq Mini guide, make sure you have the basic required tools by opening a terminal and executing the following commands:
sudo apt-get update
sudo apt-get install git
sudo apt-get install gtkterm
Now download the necessary files for the file system and the PX4 stack (of course, you may first make a new folder, and execute these commands from there):
git clone https://github.com/PX4/Firmware.git
Before building the PX4 software, you'll need to make your username a part of the group "dialout". From a terminal, execute the following command:
sudo usermod -a -G dialout $USER
Build PX4 Executable
Navigate to the PX4 directory, update the git submodules and build PX4.
git submodule update --init --recursive
make posix_ocpoc_cross
Now the PX4 executable is built and ready to go onto the SD card.
Load Files onto SD Card
Different files will be loaded onto each partition that you created on your SD card. Be careful that files are being loaded on the correct partition. The names of the partitions may be different than those used here. To see the names of the partitions, you can do
ls /media/<your_username>/
'boot' Partition
In a terminal navigate to the folder we cloned from github 'OcPoC_Zynq_Mini_Files' and execute the following command.
cp uImage devicetree.dtb uramdisk.image.gz BOOT.bin /media/<username>/boot/
'rootFs' Partition
Next we'll move the Petalinux files onto the SD card. Return to the OcPoC_Mini_Zynq_Files directory that we cloned from github.
sudo cp rootfs.cpio.gz /media/<your_username>/rootFs/

cd /media/<your_username>/rootfs
sudo gzip -d rootfs.cpio.gz
sudo cpio -idm < rootfs.cpio

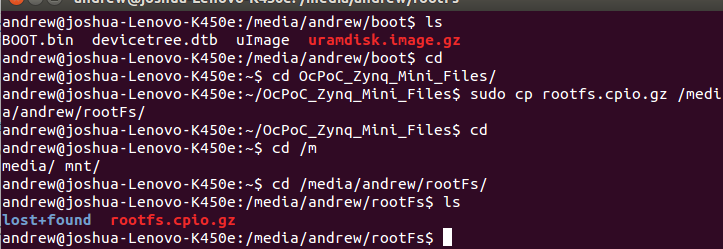
You terminal should look like this (with a 'ls') command
Copy PX4 Executable to SD Card
Navigate back to the PX4 Firmware directory (the top directory of the PX4 code). The first time you run PX4 on OcPoC, you'll need to copy a few folders in addition to the PX4 executable. Execute the following commands:
sudo cp -r ROMFS/ /media/<your_username>/rootFs/home/root/.
sudo cp -r posix-configs/ /media/<your_username>/rootFs/home/root/.
sudo cp build/posix_ocpoc_cross/px4 /media/<your_username>/rootFs/home/root/.
NOTE: after you have the ROMFS, posix-configs, and test_data folders located on the SD Card, you only need to copy a new PX4 executable to the SD Card when you build a new PX4
Updated over 8 years ago
